viernes, 24 de agosto de 2012

PowerBuilder - The new kid on Developer Center's block


I'm going to be totally honest...the last time I used PowerBuilder was about 8 years or more...and I didn't think I was going to use it again...until I read this document from my team mate Uwe Kylau called PowerBuilder Developer Center and I knew this was the time.

This days, everything is about SAP HANA and I can't of course, stay away from it, so I decided to swept away the dust from my PowerBuilder skills and try to make an application involving SAP HANA.

PowerBuilder 12.5 offers to different IDE environments, or better explained, the classic and the enhanced ones. Being an old time developer (more than 14 years now) I decided to go with the classic one.

First thing I did, was to open my PowerBuilder environment and prepared it to support SAP HANA via JDBC.

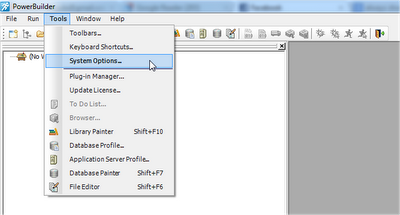
Easy as it sounds, I just need to go to Tools --> System Options --> Java and choose the folder where then ngdbc.jar is located.


After that, I established the connection with my Amazon Web Services SAP HANA Server. For this I went to Tools --> Database Painter and in the JDB JDBC choose New Profile... --> fill the parameters and I was ready to rock...


With that ready, the time for application creation was just around the corner.

On the menu File --> New. I create a new Workspace and a .NET Windows Forms Application and after that a Grid DataWindow.


When we create a DataWindow we need to specify from where it's going to take the information. For this one, choose SQL Select, and then choose the table VOTES_DETAIL which we create on the blog Quick SAP HANA and R usecase and as the field choose COUNTRY and then Design --> Distinct. As we don't want duplicated values. Save it and call it dg_country.


Repeat the same steps but this time for the field Age. Call this one dg_age.

When you have finished with this, create a new DataWindow but this time of type Freeform and choose External as the Data Source in the next window. This will show us a new window asking for a Result Set, use the following.


In the editor window, choose the Country field and the go to the Properties Window and choose Edit. Change the Style type to DropDownDW and fill the following values.


DataWindow is the the value from where we are going to get the data for our DropDown control. Save as call it ff_params.

Create a new DataWindow of type Grid and choose SQL Select as the Data Source. Select all fields and choose Design --> Retrieval Arguments (This is very important as it will allows us to pass the values of the Drop Down control to our report).
Specify the arguments as follows...


In the Where tab fill in the parameters and the arguments. Call this one dg_report.


Now, we have to create a new DataWindow (Don't worry...it's the last one) of type Graph and define the following Expressions.


For the graph style, choose what you want...I like pies...


Save it and call it dg_graph.

And now for something completely different...let's create a PB Object of type Window. From the menu Insert we can put two buttons and simply drag and drop the DataWindows ff_params and dg_report.

Your layout should end like this one...save it and call it w_window.


One important thing before we go into the coding part of this blog, is that we need to go back to the Database Painter, choose our connection and go to the Preview tab, using the Copy button will help us to get the value we need, which is the connection details.


Now...source code! (Screaming please)

Double click the application and write the following code.


Going back and double click the Show Report button and paste this code.


Do the same in the Show Graphic button.


Finally, press right click and choose Script on w_window and add this code.


Let's run the application and see how it works...


There you go...a quick and nice application using PowerBuilder and SAP HANA...

Greetings,

Blag.


martes, 14 de agosto de 2012

SUP on AWS - A better Flights example


I have dealt with this problem before, but never really spend time trying to solve it, until someone ask for it on the forums...

When we create an SUP application, most of the time we use text boxes to send the information and retrieve some data, or maybe we can use a choice control with some hardcode values.

What if for example, we want to have a better Flights example, one that will show us a choice already populated with all the available airlines...that would be cool, right? And actually...it's easier than it sounds...

For this to work, we need to first log into our ERP system and create an structure called ZFLIGHT_DETAILS.


Then, a Table Type based on that structure.


Finally...a really simple RFC Function Module...too simple if you ask me...


This FM will simply return all the Airlines along with their codes.

With that ready, we can move into our Unwired Workspace and create a project. In this new project create two MBO's. One related to our FM ZGET_AIRLINES and the other related to BAPI_FLIGHT_GETLIST.


Here, it's important to create a Personalization Key just for the GetFlightsMBO and of course, don't forget to link it.


After saving and deploying the server, we need stablish our Starting Points. And here comes the exciting part...as we're going to choose not only the first option, but the third one as well.


When we double click on the "Activate" screen, we will have an empty window with a link saying "Submit Workflow"...here, you can get creative and use your company logo...write a message...and of course, change "Submit Workflow" to "Start" or "Begin the journey"...anyway...my job is not build commercial software, so I leave it just like that...


When we click on the "Submit Workflow" link, can establish it's properties, and here we're going to call our FM. Keep in mind that it's very important that the Default Success Screen is set to "Start"


Now, we have to move to the "Start Screen", and add a Choice control and link with the name "Get Flights".


When we set the properties for the Choice control, you will see where the magic comes from.


Don't forget to link the Personalization Key.


Finally, our model should look like this one...


We must save and generate our project in order to see it of the mobile device of our choice.


I hope you like this blog and I hope you already have your own SUP server on Amazon Web Services...otherwise...go and do it! In the meantime you can create your own SAP HANA and R servers as well...

Greetings,

Blag.

lunes, 13 de agosto de 2012

Quick SAP HANA and R usecase


DISCLAIMER: I'm not an SAP HANA expert or an R expert, not even a Python expert. I'm just a guy with a lot of ideas who loves to write blogs.

The other day I was thinking about making some nice with SAP HANA and R, because people doesn't seem to be enough interested in R yet, and that's a real shame...R is just awesome and SAP HANA is more awesome...so bringing them together is...I think you got the idea...

First thing that came into my mind was a survey...first name, last name, country, age, sex and a favourite programming language...of course...I need a lot of records...more that I could generate by hand...so...a Python script came to the rescue...I thought...why I don't take my team's names and last names, countries of origin, made up some ages and other things just to fill up the mix. The script will basically generate random entries that will get loaded into SAP HANA.

Vote_Generator.py
import os
import sys
import random
 
names = ["Anne", "Gigi", "Juergen", "Ingo", "Inga", "Alvaro", "Mario", "Julien",
"Mike", "Michael", "Karin", "Rui", "John", "Rocky", "Sebastian", "Kai-Yin",
"Hester", "Katrin", "Uwe", "Vitaliy"]
last_names = ["Hardy", "Read", "Schmerder", "Sauerzapf", "Bereza", "Tejada",
"Herger", "Vayssiere", "Flynn", "Byczkowski", "Schattka",
"Nogueira", "Mayerhofer", "Ongkowidjojo", "Wieczorek", "Gau", "Hilbrecht",
"Staehr", "Kylau", "Rudnytskiy"]
age = [24, 34, 40, 38, 28, 36, 35, 42, 30, 37]
sex = ["M", "F"]
country = ["Germany", "France", "Polland", "Peru", "Russia", "USA", "China",
"Philippines", "Portugal", "Spain"]
vote = ["ABAP", "Node", "Ruby", "Python", "R", "PHP", "ActionScript",
"Euphoria", "Java", "C++"]
 
def Generate_File(pSchema, pNumber):
    iNumber = 0
    pathname = os.path.dirname(sys.argv[0])
    pathname = os.path.abspath(pathname) + "\HANA_File.txt"
    myfile = open(pathname, "a")
    while iNumber < pNumber:
        r_names = random.randrange(0, 20)
        r_lastnames = random.randrange(0, 20)
        r_age = random.randrange(0, 10)
        r_sex = random.randrange(0, 2)
        r_country = random.randrange(0, 10)
        r_vote = random.randrange(0, 10)
        iNumber += 1
        myfile.write("insert into " + pSchema + " values('" +
        names[r_names] + "','" + last_names[r_lastnames] + "'," +
        str(age[r_age]) + ",'" + sex[r_sex] + "','" + country[r_country] +
        "','" + vote[r_vote] + "');\n")
    myfile.close()
    print 'The file ' + pathname + ' was written successfully'
 
schema = raw_input("Schema: \n")
num_files = input("How many records?: \n")
Generate_File(schema, num_files)

The execution is fair simple...we pass the schema and the number of files we want to generate...for this blog...200,000 records sounded like a good deal.


As you can see...some random funny names are generated, but after all, we're a team so I don't think they care too much.

Next step was to create the table in SAP HANA and load the records.


The main goal of our RHANA code is to have a detailed information on how many women or men of certain age from a certain country voted on the survey. Something like CHINA --> 24 --> F --> 890. (890 women of 24 years old from China voted on the survey). So of course, we need to create a table to handle that information as well.


With those pieces ready...we can code our script...

HANA_R_Votes.sql
DROP TYPE T_VOTES_DETAIL;
 
CREATE TYPE T_VOTES_DETAIL AS TABLE (
COUNTRY VARCHAR(15),
AGE CHAR(2),
SEX CHAR(1),
FREQUENCY INTEGER
);
 
DROP PROCEDURE CALCULATE_VOTES;
DROP PROCEDURE GET_VOTES;
 
CREATE PROCEDURE CALCULATE_VOTES(IN votes VOTES, out votes_detail T_VOTES_DETAIL)
LANGUAGE RLANG AS
BEGIN
Country<-votes$COUNTRY
Age<-votes$AGE
Sex<-votes$SEX
Votes<-table(Country, Age, Sex)
Stats<-data.frame(Votes)
Stats<-subset(Stats,(Stats$Freq>0))
Stats<-Stats[order(Stats$Country,Stats$Age),]
votes_detail<-data.frame(COUNTRY=Stats$Country,AGE=Stats$Age,SEX=Stats$Sex,FREQUENCY=Stats$Freq)
END;
 
CREATE PROCEDURE GET_VOTES()
LANGUAGE SQLSCRIPT AS
BEGIN
tab_votes = SELECT * FROM VOTES;
CALL CALCULATE_VOTES(:tab_votes, T_VOTES_DETAIL);
INSERT INTO "VOTES_DETAIL" SELECT * FROM :T_VOTES_DETAIL;
END;
 
CALL GET_VOTES();
SELECT * FROM VOTES_DETAIL

When everything is ready, we call the GET_VOTES() procedure which is going to read the 200,000K records from SAP HANA, send them to our R server to process the data and then send it back to SAP HANA to fill up a table with the information we want to take care of.


Yes...the whole process took less that 2 seconds...for 200,000K records...is not bad at all...
We can now select the information from our condensed table...


Now that we have the information we want, we can use SAP HANA analysis capabilities to...analyse our data...


I gotta say...that was pretty easy and fast...might not be the best scenario ever, but I'm sure it will you a better perspective of what can be done with SAP HANA and R.

Greetings,

Blag.

jueves, 9 de agosto de 2012

SUP on AWS - From Blag's point of view

The other day I read My 1st Sybase Unwired Platform app on AWS from Tobias Hofmann which is both a friend and an SAP Mentor. Tobias doesn't seems to be much happy with SUP on Amazon...so of course...I needed to test it myself.

Using the documentation from the all time guru Juergen Schmerder called Get your own Sybase Unwired Platform server on Amazon Web Services I was able to download the SDK and create my AWS image...which, to be honest, got broke as I made some silly mistakes...but it just took me a couple of minutes to clean up the mess, and create a new image that worked like a charm...I had my own SUP server up and running.

After I installed the Android emulator, installing the Sybase Workflow application wasn't hard at all...I simply need to call it like this...

Installing Sybase Workflow
<path_to>\adb install <path_to>\SybaseDataProvider.apk

The first thing I noticed as I was doing my first example, was something that Tobias experienced himself...a DLL was missing or couldn't be read...


I was really puzzled by this...I even log into the Remote Desktop to copy the file and create the same structure on my laptop...didn't work...until I found a comment from Pasquale de Angelis that magically solved the problem.

Now...I wanted to make a nice example, because reading from the flight tables is too mainstream...so I decided to do something else.

I thought about RFC_ABAP_INSTALL_AND_RUN but...one of input parameters is table, with an structure and even then the preview worked fine I couldn't really find a way to make it work using Personalization Keys...so...of course I create my own ZRFC_ABAP_INSTALL_AND_RUN.

UPDATE: RFC_ABAP_INSTALL_AND_RUN is not released as stated in https://service.sap.com/sap/support/notes/514998 and shouldn't be used on a productive environment. This is just an example on a blog and should be taken as it is.


I basically got rid of the input table and put 8 parameters to hold the source code to be executed.


With the RFC Function Module ready, I could get into the SUP hard work...and BTW...for this to really work I needed to create an empty program called ZTEST on my ERP system.


I create an MBO related to my FM and 8 Personalization Keys, one for each parameter.


I associate the Personalization Keys with the arguments on the MBO.


Inside the screen, I create the parameters and code submission menu.


A simple association of Personalization Keys and Parameter Keys to do the trick.

After that...which really didn't took more than 5 minutes, I was ready for the final test...running a simple ABAP program on Android...

ABAP LOOP
REPORT ZTEST.
DATA: COUNTER TYPE I.
DO 10 TIMES.
COUNTER = COUNTER + 1.
WRITE:/ 'Counter value is:', COUNTER.
ENDDO.


It worked just fine! So...no test can be completed without a more complex example...

ABAP_SELECT
REPORT ZTEST.
DATA: T_SPFLI TYPE STANDARD TABLE OF SPFLI.
FIELD-SYMBOLS: <FS_SPFLI> LIKE LINE OF T_SPFLI.
SELECT * FROM SPFLI INTO TABLE T_SPFLI.
LOOP AT T_SPFLI ASSIGNING <FS_SPFLI>.
WRITE:/ <FS_SPFLI>-CARRID, <FS_SPFLI>-CONNID.
ENDLOOP.


Cool, huh? I didn't have any connection problems with AWS...the service was very stable and reliable...after all, I have an SAP HANA Server and an R Server sitting next to my new SUP server.

Greetings,

Blag.