jueves, 28 de junio de 2012

When SAP HANA met R - Bring home your graphics


A couple of days ago, I started to think about SAP HANA and R on Amazon Web Services...as far as I know, graphics can't get generated using this kind of integration because the graphic will get generated on the server and could not make the trip back into HANA Studio...so I kept thinking as said to myself..."Wouldn't it be a good idea to use a Linux command to send my email the graphics generated in the R server?"...I had a deal for sure...

I spend a couple of days trying to install X11 on my SUSE box...until I discovered...that it's a headless server and doesn't provide any support for X11...that really bring me down as I tried to hard...anyway...as nothing can stop my ideas from becoming some real...I thought of using PDF generation as it doesn't need X11 at all...but...today...after doing some more research...I discovered that the Cairo library supports image creation without the need of X11...

If you haven't installed SAP HANA and R on Amazon Web Services, read this... When SAP HANA met R - First kiss.

Let's take a look at what we need to do:

Install Cairo
zypper install cairo-devel


Install Cairo library on R
>R
>install.packages("Cairo")

Start the Rserve server
R CMD Rserve --RS-port 6311 --no-save --RS-encoding "utf8"

Using the same user you used for starting the Rserver Server, create a folder and change it's permissions...

Change permissions
>chmod 777 Blag

Now, we can move to HANA Studio.
We need to first create a table called TICKETS_BY_YEAR_MONTH.


Create_and_send_graphics
drop procedure GetTicketsByYearMonth;
drop procedure Generate_Graphic;
drop procedure Get_Tickets;

CREATE PROCEDURE GetTicketsByYearMonth(IN var_year NVARCHAR(4),IN var_month NVARCHAR(2))
LANGUAGE SQLSCRIPT AS BEGIN
select count(bookid), carrid from sflight.snvoice
where year(fldate) = VAR_YEAR
and month(fldate) = VAR_MONTH
group by carrid
into TICKETS_BY_YEAR_MONTH;
END;

CREATE PROCEDURE Generate_Graphic(IN tickets_year TICKETS_BY_YEAR_MONTH, OUT result TICKETS_BY_YEAR_MONTH)
LANGUAGE RLANG AS
BEGIN
setwd("/Blag")
library("Cairo")
tickets=as.integer(tickets_year$TICKETS)
carriers=as.character(tickets_year$CARRIERS)
Cairo(600,600,file="Tickets.png",type="png",bg="white")
barplot(tickets,names.arg=carriers,main="Tickets for December 2011")
dev.off()
command<-"uuencode Tickets.png Tickets.png | mail -s 'Tickets December Report' atejada@gmail.com"
system(command,intern=TRUE)
result<-data.frame(TICKETS=tickets,CARRIERS=carriers)
END;

CREATE PROCEDURE Get_Tickets()
LANGUAGE SQLSCRIPT AS
BEGIN
CALL GetTicketsByYearMonth('2011','12');
Tickets = SELECT * FROM TICKETS_BY_YEAR_MONTH;
CALL Generate_Graphic(:Tickets,TICKETS_BY_YEAR_MONTH);
END;

CALL Get_Tickets();


When we execute this, a couple of things are going to happen...


  • We're going to get the amount of tickets per airline and per year and month. We're going to save this info in a table.
  • We're going to read this information, create a graphic and save it as an .png
  • We're going to send this graphic to ourselves by email.

After execution, we're going to see a nice email...


Cool, huh? Now, we can create graphics on SAP HANA and R on Amazon Web Services -;)


viernes, 22 de junio de 2012

Analytics with SAP and R (Windows version)


My good friend and programming guru Piers Harding wrote a blog called Analytics with SAP and R where he showed us how to link the wonderful worlds of R and SAP. Yes...SAP...not SAP HANA...but the good old NetWeaver...

Piers build the RSAP extension using Linux...but I'm a Windows user...so we start the discussion and collaboration on how to build the extension for Windows 64 bits.

I gotta say...it wasn't easy...Piers doesn't have a Windows machine...so I needed to test everything...but I don't have previous R extension building experience...so after a lot of hard work from both sides, I'm happy to say that we make it work

Here are the steps to follow...


  • Install the following packages on RStudio: yaml, reshape and RUnit.
  • Go to this thread http://scn.sap.com/thread/950318 and download the latest NWRFCSDK library.
  • Download the RSAP source code from Pier's Github https://github.com/piersharding/RSAP
  • Download RTools for your R installation version
  • Inside the /src folder copy all the content from the following folders:
    • /include from your R installation
    • /include from your nwrfcsdk folder
    • /lib from your nwrfcsdk folder
  • Change the file Makevars.win (located in RSAP/src) and use this line:
    • PKG_LIBS=sapnwrfc.dll libsapucum.dll

Make sure that you're using the right R for the NWRFCSDK folder...R 64bit for NWRFCSDK 64bits. You can check this is you go to Environment Variables --> Path and look for something like this C:\Program Files\R\R-2.15.0\bin\x64 (x32 or x64)

With that ready, we can open a CMD session and write the following:

C:\> R CMD INSTALL --build --preclean --clean --no-multiarch -l C:/RSAP RSAP

You're going to sure to receive some warnings, but no worries...it should be fine as long as you see these lines...


installing to C:/RSAP/RSAP/libs/x64
** R
** preparing package for lazy loading
** help
*** installing help indices
** building package indices
** testing if installed package can be loaded
* MD5 sums
packaged installation of 'RSAP' as RSAP_0.03.zip


* DONE (RSAP)

I'm not really sure, if that's enough to have RSAP installed and ready to work...so for the sake of completion you can do this...


  • Go to your RSAP folder...and .zip the RSAP folder that it's inside.
  • Go to your RStudio and select Tools --> Install Packages --> Choose (.zip) --> Browse your .zip and press Install.

Now, we're ready to rock...just like Piers did, I'm going to use a .yml file to host my connection parameters:

ashost: "X.X.X.X"
sysnr: "00"
client: "520"
user: "idadmin"
passwd: "XXXXXXXX"
lang: EN
trace: 1
lcheck: 1
loglevel: warn

And here's the source code to our example...(For this example you need the libraries: wordcloud and tm).

library("RSAP")
library("tm")
library("wordcloud")
setwd("C:/Blag/R_Scripts")
 
 
conn = RSAPConnect("sap.yml")
parms<-list('DELIMITER' = ';',
               'FIELDS' = list(FIELDNAME = list('CARRNAME', 'FORCURAM')),
               'QUERY_TABLE' = 'ZSBOOK')
res<-RSAPInvoke(conn, "RFC_READ_TABLE", parms)
RSAPClose(conn)
 
 
sbook<-res$DATA
flds<-sub("\\s+$", "", res$FIELDS$FIELDNAME)
sbook<-data.frame(colsplit(sbook$WA,";", names=flds))
sbook_agg=aggregate(FORCURAM ~ CARRNAME, data=sbook, FUN=sum)
vect<-cbind(sbook_agg$CARRNAME,sbook_agg$FORCURAM)
new_vect<-vect[order(vect[,2]),]
new_vect<-c(new_vect[,1])
n<-length(new_vect)
new_array<-c(n,1)
carrname<-levels(sbook_agg$CARRNAME)
for(i in 1:n) new_array[i]<-carrname[new_vect[i]]
d<-data.frame(word=new_array,freq=new_vect)

To make the graphic easier to read, I add the PDF option, so a PDF would get generated.


Hope you liked this blog...Piers and I put a big effort and the rewards are awesome...now Linux and Windows users can enjoy RSAP! -:D

lunes, 18 de junio de 2012

uCertify goes online

I'm sure you have read my reviews uCertify - Certifications made easy... and uCertify - No more excuses to not get certified well...this time, my friend at uCertify took the next step and move themselves to the cloud. We can now enjoy without having to install the software on our computer. Whenever you are, you can keep study and most important...get certified -;)

We have a large amount of courses to choose from.


Let's say we want to learn Python.


As you can see in the image, we have the option to take practice exams, read books, see our analysis on how well are going or even use the study planner to set our goals.


What do you think? You get all the goodies from the Desktop version in a nice web environment. 

In this world, when we need to be constantly upgrading our skills, uCertify is the best option to study in the comfort of your house, or even on the road with this brand new cloud option.

Greetings,

Blag.

martes, 12 de junio de 2012

Twitter unfollowers with R and Rook

In my last blog I'm following you in Twitter...are you following me back? I show you how to use the Twitter APIs to get a list of the people that you follow but doesn't follow you back.

This time, I want to extend the tool as I installed the Rook library on my RStudio -:)

So..what is Rook? Nothing more that just a nice Web Server for R...something that I was really missing in R when compared to Ruby (Sinatra, Camping) or Python (Bottle, Flask).

The idea here is that we request a Twitter username and then provide the list with the "Bad People". Here's the source code...

require("Rook")

Get_Twitter_Info<-function(p_source){
  web_page<-readLines(p_source)
  mypattern = '<id>([^<]*)</id>'
  datalines = grep(mypattern,web_page,value=TRUE)
  getexpr = function(s,g)substring(s,g,g+attr(g,'match.length')-1)
  g_list = gregexpr(mypattern,datalines)
  matches = mapply(getexpr,datalines,g_list)
  result = gsub(mypattern,'\\1',matches) 
  names(result) = NULL
  return(result)
}

Get_Screen_Name<-function(p_userid){
  user_url<-paste("https://api.twitter.com/1/users/lookup.xml?user_id=",
                      p_userid,"&include_entities=false")
  web_page<-readLines(user_url)
  mypattern = '<screen_name>([^<]*)</screen_name>'
  datalines = grep(mypattern,web_page,value=TRUE)
  getexpr = function(s,g)substring(s,g,g+attr(g,'match.length')-1)
  g_list = gregexpr(mypattern,datalines)
  matches = mapply(getexpr,datalines,g_list)
  screen_name = gsub(mypattern,'\\1',matches)
  names(screen_name) = NULL
  return(screen_name)
}

trim <- function(x){
  x<-gsub(' ','',x)
  return(x)
} 

newapp<-function(env){
  req<-Rook::Request$new(env)
  res<-Rook::Response$new()
  res$write('<form method="POST">\n')
  res$write('Enter your Twitter username: <input type="text" name="UserName">\n')
  res$write('<input type="submit" name="Get Bad People!">')
  res$write('</form>')

  People_Id<-""
  Bad_People<-c()
  Bad_Names<-c()
  j<-0  
  
  if (!is.null(req$POST())) {
    UserName = req$POST()[["UserName"]]
    
    followers_link<-paste("https://api.twitter.com/1/followers/ids.xml?cursor=-1&screen_name=",UserName)
    following_link<-paste("https://api.twitter.com/1/friends/ids.xml?cursor=-1&screen_name=",UserName)
    followers_link<-trim(followers_link)
    following_link<-trim(following_link)    
    followers<-Get_Twitter_Info(followers_link)
    following<-Get_Twitter_Info(following_link)
        
    for(i in 1:length(following)) {
      j<-j+1
      if(j>=100){
        j<-0
        People_Id<-substring(People_Id,2)
        Bad_People<-Get_Screen_Name(People_Id)
        Bad_Names<-append(Bad_Names,Bad_People)
        People_Id<-""
      }
      Match<-following[i] %in% followers
      if(Match == TRUE){
      }
      else{
        following[i]<-trim(following[i])
        People_Id<-paste(People_Id,following[i],sep=",")
      }
    }    
  }
  for(i in 1:length(Bad_Names)) {
    res$write(paste(' ',Bad_Names[i],sep=' '))
    res$write('<BR>')
  }
  res$finish()
}

server = Rhttpd$new()
server$add(app = newapp, name = "Twitter_Rook")
server$start()
server$browse("Twitter_Rook")

When we run the code, the browser will open automatically showing us the application.


For my first use of Rook, I think the application looks pretty nice...and hope those that doesn't follow me back...start doing it -:P

Greetings,

Blag.


sábado, 9 de junio de 2012

I'm following you in Twitter...are you following me back?

If you spend some time on Twitter, you might have some followers and some people that you follow...the more time you spend, the more people you're going to interact with...

Sometimes, you just realized that you're following some many people that might or not follow you back...for some "accounts", it doesn't matter...I mean...if I follow @annafaris I don't expect her to follow me back...would love that of course, but I have some common sense -:) But...when it's a John Doe that I follow...and doesn't follow me back...things get personal...and it's time to clean up Twitter a little bit...

Twitter provides some useful APIs that are sadly restricted to only 150 calls per hours as you can verify by calling Rate_Limit_Status.

Anyway...I was thinking about doing something with Twitter and specially the people that I follow and doesn't follow me back...so of course...I choose #R as I have already done some interesting things with Python...

setwd("C:/Debug/R Source Codes")

Get_Twitter_Info<-function(p_source){
  web_page<-readLines(p_source)
  mypattern = '<id>([^<]*)</id>'
  datalines = grep(mypattern,web_page,value=TRUE)
  getexpr = function(s,g)substring(s,g,g+attr(g,'match.length')-1)
  g_list = gregexpr(mypattern,datalines)
  matches = mapply(getexpr,datalines,g_list)
  result = gsub(mypattern,'\\1',matches) 
  names(result) = NULL
  return(result)
}

Get_Screen_Name<-function(p_userid){
  user_url<-paste("https://api.twitter.com/1/users/lookup.xml?user_id=",
                      p_userid,"&include_entities=false")
  web_page<-readLines(user_url)
  mypattern = '<screen_name>([^<]*)</screen_name>'
  datalines = grep(mypattern,web_page,value=TRUE)
  getexpr = function(s,g)substring(s,g,g+attr(g,'match.length')-1)
  g_list = gregexpr(mypattern,datalines)
  matches = mapply(getexpr,datalines,g_list)
  screen_name = gsub(mypattern,'\\1',matches)
  names(screen_name) = NULL
  return(screen_name)
}

trim <- function(x){
  x<-gsub(' ','',x)
  return(x)
} 

followers<-Get_Twitter_Info("https://api.twitter.com/1/followers/ids.xml?
                                cursor=-1&screen_name=Blag")
following<-Get_Twitter_Info("https://api.twitter.com/1/friends/ids.xml?
                                cursor=-1&screen_name=Blag")

People_Id<-""
Bad_People<-c()
Bad_Names<-c()
j<-0

for(i in 1:length(following)) {
  j<-j+1
  if(j>=100){
    j<-0
    People_Id<-substring(People_Id,2)
    Bad_People<-Get_Screen_Name(People_Id)
    Bad_Names<-append(Bad_Names,Bad_People)
    People_Id<-""
  }
  Match<-following[i] %in% followers
  if(Match == TRUE){
  }
  else{
    following[i]<-trim(following[i])
    People_Id<-paste(People_Id,following[i],sep=",")
  }
}

write.csv(Bad_Names,"Bad_Names.csv",row.names=FALSE)

This little program will take my followers (from my account @Blag), and the people I follow...a simple loop at the people I'm following allows me to determine who is following back or not. With that identified, I made groups of 100 User Id's (As the Lookup API only support 100 accounts) and grab their user names...

Finally, I generate a .CSV file with all the people who I follow but doesn't follow me back...time to clean up my Twitter -;)

P.S: Would love to show the generated file...but...don't want to expose the names of  the Bad People, who only but unforgivable crime is not to follow me back -:)

Greetings,

Blag.

viernes, 8 de junio de 2012

SAP HANA and Python? Yes Sir!


It's been a while since I wrote my last Python blog...July 15, 2011 Tasting the mix of Python and SAP - Volume 3...almost a year...so I thought it was a good thing to get back into action...but...what else could I wrote about? I started to check my options and of course I quickly thought on SAP HANA. After all, I have my own server running on Amazon Web Services so it sound like a good plan.

At first I wanted to use SAP HANA as an ODBC connection like I did with #R in the early days...but then I heard that Python was actually embedded on the SAP HANA Client installation, so it only took a little checking, and some SAP internal forum to discover that, using Python and SAP HANA is easier that I could ever imagine...

First, you need to go where your SAP HANA Client is installed, and then copy the 3 files from the hdbcli folder...


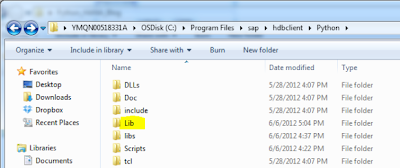
Then, go to the Python folder and copy these files into the Lib folder...


Do the same with this 2 files in the hdbclient folder, copy them and paste them into the Python/Lib folder...


With that, we're ready to go...download any Python IDE and assign Python.exe (from the Python folder on hdbclient) as the Python executable.


import dbapi
 
conn = dbapi.connect('ecX-XX-XX-XXX-XXX.compute-1.amazonaws.com',
     30015, 'SYSTEM', 'manager')
 
print conn.isconnected()


If this little program prints "TRUE" on the screen, it means that the connection is done.

Go to http://pypi.python.org/pypi/setuptools#windows and copy the ez_setup.py file into your Python folder. Executed in the command line like Python ez_setup.py to install the tools and then add the directory "full path/Python/Scripts" to your path variable in the Windows System variables...

With that, you can directly call Easy_Install...that we're going to need in order to install Bottle, a Python Web Micro framework.

In the command prompt write:

easy_install -U bottle

With that, we're ready to start


from bottle import get, post, request, run, redirect, route
import dbapi
import time
 
 
@get('/login')
def login_form():
    return '''<DIV ALIGN='CENTER'><BR><BR><BR><BR>
                <H1>Python (Bottle) & SAP HANA</H1>
                <BR><TABLE BORDER='1' BORDERCOLOR='BLUE'
                     BGCOLOR='WHITE'>
                <FORM METHOD='POST'>
                <TR><TD>Server</TD><TD>
                <INPUT TYPE='TEXT' NAME='Server'></TD></TR>
                <TR><TD>Port</TD><TD>
                <INPUT TYPE='TEXT' NAME='Port'></TD></TR>
                <TR><TD>User</TD><TD>
                <INPUT TYPE='TEXT' NAME='User'></TD></TR>
                <TR><TD>Password</TD>
                <TD><INPUT TYPE='PASSWORD' NAME='Passwd'></TD></TR>
                <TR><TD COLSPAN='2' ALIGN='CENTER'>
                <INPUT TYPE='SUBMIT' value='Log In' NAME='LOG_IN'>
                <INPUT TYPE='RESET' value='Clear'></TD></TR>
                </FORM>
                <TABLE>
              </DIV>'''
 
 
@post('/login')
def login_submit():
    global cur
    Server = request.forms.get('Server')
    Port = request.forms.get('Port')
    User = request.forms.get('User')
    Passwd = request.forms.get('Passwd')
    Port = int(Port)
    conn = dbapi.connect(Server, Port, User, Passwd)
    cur = conn.cursor()
    redirect("/parameters")
 
 
@get('/parameters')
def choose_parameters():
    global cur
    query = "SELECT CARRID,CARRNAME FROM SFLIGHT.SCARR WHERE MANDT = 300"
    ret = cur.execute(query)
    ret = cur.fetchall()
    output = "'<CENTER><FORM METHOD='POST'>"
    output += "Carrier <SELECT NAME='Carrid'>"
    for row in ret:
        carrid = str(row[0])
        carrname = str(row[1])
        output += "<OPTION VALUE='%s'>%s</OPTION>" % (carrid, carrname)
    output += "</SELECT>"
    query = "SELECT DISTINCT CITYFROM FROM SFLIGHT.SPFLI WHERE MANDT = 300"
    ret = cur.execute(query)
    ret = cur.fetchall()
    output += "City From<SELECT NAME='Cityfrom'>"
    for row in ret:
        cityfrom = str(row[0])
        output += "<OPTION VALUE='%s'>%s</OPTION>" % (cityfrom, cityfrom)
    output += "</SELECT>"
    output += "<INPUT TYPE='SUBMIT' value='Show Query' NAME='show_query'>"
    output += " </FORM></CENTER>"
    return output
 
 
@post('/parameters')
def show_query():
    counter = 0
    start = time.clock()
    carrid = request.forms.get('Carrid')
    cityfrom = request.forms.get('Cityfrom')
    query = '''SELECT SBOOK.CARRID,SBOOK.CONNID,FLDATE,
                PASSNAME,CITYFROM,CITYTO
                FROM SFLIGHT.SBOOK INNER JOIN SFLIGHT.SPFLI
                ON SBOOK.CONNID = SPFLI.CONNID
                WHERE SBOOK.CARRID = '%s' AND CITYFROM = '%s'
                AND PASSNAME <> ''
                AND SBOOK.MANDT = 300
                AND year(FLDATE) = 2012
                ORDER BY FLDATE DESC''' % (carrid, cityfrom)
    ret = cur.execute(query)
    ret = cur.fetchall()
    output = "<DIV ALIGN='CENTER'><TABLE BORDER='1'>"
    output += "<TR BGCOLOR='#B9C9FE'>"
    output += "<TH>Carrier</TH><TH>Connection</TH>"
    output += "<TH>Flight Date</TH><TH>Passenger Name</TH>"
    output += "<TH>City From</TH><TH>City To</TH>"
    output += "</TR>"
    for row in ret:
        counter += 1
        carrid = str(row[0])
        connid = str(row[1])
        fldate = str(row[2])
        passname = row[3].encode('utf-8')
        cityfrom = row[4].encode('utf-8')
        cityto = row[5].encode('utf-8')
        output += "<TR BGCOLOR='#E8EDFF'>"
        output += '''<TD>%s</TD><TD>%s</TD>
                         <TD>%s</TD><TD>%s</TD>
                         <TD>%s</TD><TD>%s</TD>''' 
        % (carrid, connid, fldate, passname, cityfrom, cityto)
        output += "</TR>"
    output += "</TABLE>"
    end = time.clock()
    time_taken = end - start
    output += "<H1>%s records in %s seconds</H1></DIV>" 
              % (counter, time_taken)
    return output
 
run(host='localhost', port=8080)

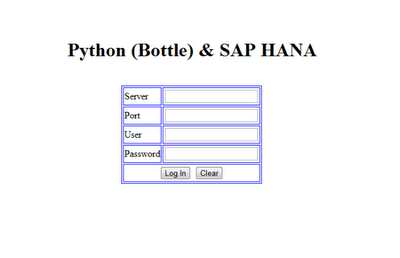
We when run this code, the Bottle Web Server is going to start, so we need to go to http://localhost:8080/login to start the application.


We need of course to log in -;)


We can choose a Carrier and the City From for our query (Of course, both Dropdown list are filled with data coming from SAP HANA).


Let's show the query in a nice table...


It took a little bit more than 3 seconds to fetch data from SAP HANA and the to print it on Python. Almost 3K records in 3 seconds? That's fast...specially when we considered that Python is not exactly the fastest tool in the market -:)

I hope you like this blog, as I really enjoyed working on it. It's always a great experience to use Python, SAP HANA or any other programming language to develop something new -;)

Greetings,

Blag.

SAP HANA vs. PostgreSQL - Small test

Someone left a comment on my blog SAP HANA vs. MySQL - Small test saying:

i think that if you retry this test using PostgreSQL you could have another surprises ;)


Of course, I'm always up for the challenge, so I installed PostgreSQL and did the same thing...


94ms for 1K records? Of course I was surprised...as in SAP HANA we had...


1.18 seconds...that's 0.094 seconds...almost 94% faster than SAP HANA...I started to think about and realized of course, that there was a significant difference between these two tests...first, PostgreSQL is doing the upload in background, while SAP HANA was writing all the "Statement 'insert...'" messages...so...remember that I told you that there was a faster method to upload data in SAP HANA? By just uploading a .CSV file?

Well...to make things interesting, I generate a new file with 3K records...here are the results...


It took PostgreSQL only 281 ms to load the 3K records...pretty fast, huh? 0.281 seconds...

Let's see how SAP HANA behaved...


Nice...it only took 116 ms to load...0.116 seconds...

Meaning that in this new test, SAP HANA was almost 58% faster...

Nice test for sure...and SAP HANA show why it's the fastest and coolest In-Memory Database out there...

Greetings,

Blag.